Monday, January 30, 2017

Love Notions Terra Tunic

Love Notions has just released a new pattern... the Terra Tunic.*

I took a little bit of a break from sewing after Christmas, but this pattern was just what I needed to get reunited with my sewing mojo. 

I'm so happy that I sewed this up!


Honestly, I'm a sucker for a tunic. I have a long torso and store bought shirts are rarely long enough unless they are a tunic. I've even been known to wear mini dresses as long shirts. This is just another reason why I love sewing: I can make things that fit me instead of struggling with limited options in stores. 

There are quite a few tunics and long shirts on the sewing market already, but check out the options in this pattern:

First of all, there are five different neckline options:

-Scoop Neck
-V-Neck
-Asymmetrical
-Boatneck
-Funnel
-V-Neck Hood

There are also optional elbow patches and welt pockets. The designer even includes a video tutorial for the welt pockets. Love Notions always has excellent instructions included in her patterns, but the video tutorial is a nice bonus! 

I chose to sew the asymmetrical neckline, because I don't have anything else like it in my closet. I like variety. 


Isn't that a fun neckline? The buttons are optional, but I'm glad I added them. They add a nice weight to the collar and I just like wood buttons. 

My dad says that raisins go with everything. Maybe I'll start saying that wood buttons go with everything. (Hi dad! I'm sure you are reading this. Happy birthday by the way!)

Can we talk about that fabric for a second? It's a medium weight sweater knit from So Sew English. It's so soft. It was easy to sew with, which was a nice surprise because if you have sewn with sweater knits before, you know how nasty they can be sometimes. This particular one was a piece of cake to sew and the weight is perfect. 

I can never go back to store bought clothes after being spoiled with these nice fabrics. I took my daughter clothes shopping last week and I cringed feeling how thin some of the fabrics were. But I didn't have much choice. It was either buy them or wait until I have time to sew for her, which would have meant she would have to go naked until I got around it to it. I bought her the clothes. 

So Sew English has a Facebook page here and their online store is here. You will want to join the Facebook group to see when they have their store stockings and to follow for other store information. 


I didn't make any modifications to this tunic except for adding one inch in length at the waistline. The fit is wonderful. For those who care about good drafting, the sleeves were not cut on the fold and the testing was very thorough on the fit overall. 

The bustline, waistline, and hip line are all marked which makes it easy to alter the pattern should you need to. In addition to the size chart, there is also a finished measurement chart. 


The tunic has a deep (2.5") split hem, with the back being longer than the front. 

I do want to take a minute to brag about my stripe matching on the side seam. Check this out, the seam is almost invisible. High five to me! (Seriously, this doesn't always happen, so I'm going to take advantage this time and be a show off.)

Boom, stripe matching like a boss! 

The Terra Tunic is is currently on sale for 20% here.* 

Be sure to check out the link above to see all the pictures of the other necklines! I think I want to try a boatneck next. 

For more inspiration, check out more blog posts: 

Mac styled her funnel neck tunic with a vest, which I never would have thought of doing, but is completely adorable. Her blog is found here. 

Kimberly made a beautiful striped boatneck, found here.  

And check out Stacey's hooded version here: I seriously need a hooded one too. Thankfully I have my sewing mojo back so maybe I will knock out a few more Terra Tunics soon and try more options. 


*There are affiliate links in my post. I receive a small compensation for any purchase you make using an affiliate link. I have a sewing addiction, so I greatly appreciate it. All opinions are my own and I do not promote a pattern I do not love.


Sunday, November 20, 2016

Whistler by Love Notions

Brrrr... I don't know about where you live, but here in Kansas, it just got cold overnight. 

I won't lie and pretend I'm happy about it, but the fact that I just finished sewing two cozy pullovers makes me hate this change in weather a little less. 

Just a little. Don't get me wrong, I'm still counting down the days until the 90+ degree temperatures come back. 

But if I must be out in the cold, at least I can do it wearing this:


Or this:


This is the newest pattern by Love Notions: The Whistler Pull-over by Love Notions. 

I helped test it, and I'm so glad I did. I am probably going to wear both pieces a lot this winter. If you see me a lot, you might get sick of seeing them. Too bad for you, because I doubt I get sick of wearing them.

The pattern is for a loose fitting pullover, meant to be able to be worn over light layers. I just wore mine over a cami, but I could also wear it over a tee if I wanted to.

There is a shawl or hooded version. I made both of mine with the shawl because I love it so much, but I will probably have to make a hoodie in the future too.

The front can be gathered or not. I stuck with the plain front on both because my fabric was very sturdy and heavy. Gathers would not have been a good option for my fabric, but if I make one in a lighter fabric, I might give that option a try.

The length options are hemmed (shortest), banded (slightly longer) and tunic (duh, this is the longest choice.) There is a finished measurement chart in the pattern and that includes lengths by size for each of those options, as well as instructions on how to lengthen or shorten the pattern. 

For my grey version, I made the tunic, in french terry from Joanns:


And for my red pullover, I made the banded length. I did add an inch to the length because I'm 5'7" and the pattern is drafted for a height of 5'5". I absolutely love this length, and feel comfortable wearing it with either leggings or jeans. Yay, more chances to wear it!

This is actually a Ponte De Roma fabric from Walmart. I normally don't buy fabric there, but I always glance at it. 

Just in case. 

It's totally normal to go look at fabric just in case, right? Well, I'm glad I did. I'm very happy it, it has a nice weight and feels soft.   


The design is genius. 

You might have noticed my hand in my pocket in a lot of pictures so far. 

Yes, this pullover has pockets. And they fit right in with the design of the sweater. 

When I first saw the line drawing, I wasn't sure how the pockets would function. I was wondering if they would be large or bulky, but they are actually the perfect size. Not too huge where I would lose a million things in them, but big enough for my phone, or my keys, or even my credit card. I hate taking a purse anywhere, so this might become my grocery store day shirt. 

Here is one of the pockets inside out:
Check out my cute pocket!

The shawl piece (or hood) is closed with two buttons. The instructions have you construct buttonholes so that you can open the shawl piece while dressing, but I couldn't find my buttonhole foot so I just sewed my buttons though both shawl layers. There is still a big enough opening to get it on and off easily, so it works just fine if you aren't a fan of sewing buttonholes. 

However, I think that this would be a great shirt for nursing in if you made it with the buttonholes! I don't need a nursing shirt anymore, but if I did, I would have searched for that lost foot a little more.

Hard to see, but I used wood buttons for both of my pullovers. 

To be completely honest, I was nervous about the construction of this pattern at first. The shawl, the curves, the cute pockets... I wasn't sure if I was getting in over my head. 

But the construction was actually a breeze and there is even a video in the pattern to help. My second one went together in about an hour to an hour and a half (not including cutting time, because I'm a  slow cutter.)

I feel extremely comfortable wearing both of my new pullovers. I will make more!

And just to prove how much I hate the cold, here is picture from the photoshoot, I was obviously not enjoying the weather at the moment. This was a fun one to see when I was looking through the pictures later. 


But at least I had pockets, that made it better.


If you want to make your own Whistler, you can buy the pattern here. It's on sale through Thursday and the sale price is lower now than it will be on Black Friday!


**There are affiliate links in my post. I receive a small compensation for any purchase you make using an affiliate link. I have a sewing addiction, so I greatly appreciate it. All opinions are my own and I do not promote a pattern I do not love. **

Wednesday, November 16, 2016

Sew what do I wear? Holiday Edition

Hello mermaids, pirates and other fellow sewing friends!


I am thrilled to be a part of the blog series "Sew what do I wear?" hosted by the pattern companies Made for Mermaids and Patterns for Pirates.

This is the Holiday Edition of the series. Need some inspiration for an outfit to wear over the Holidays? Maybe you have family pictures, a holiday party, or a work event and you need a new outfit? 

If so, you don't want to miss all the blog posts in this series! And if not, check them out anyways, because staring at beautifully sewn outfits is always a good time. Hopefully your creative juices will be inspired either way.

Today is the third day of the series. Days 1 and 2 can be found here and here.

I decided to create an outfit for family gatherings that will inevitably happen over the holiday season. 

Sew, what do I wear for the family gatherings? 


Honestly, my family wouldn't care if I showed up in pajama pants and a t-shirt. I mean, I might know from experience. I plead the fifth.

But as all of our individual families grow larger, it seems like the times all of the larger family, aunts, uncles, cousins, sometimes second cousins and people twice removed (or whatever that means) get together gets more spread out. So I wanted something I could wear that looks more put together for a large family gathering. 

I did have other requirements as well, such as:

-I want to be comfortable. I will be chasing after four kids, two of those being busy toddlers. We also play games and sometimes get pretty active. There might be an intense game of spoons and I need to be prepared. I'm not going to lose because of poor mobility. No way.

-I don't want to shave my legs. It's winter, come on, let's be real.

-I want to be able to show off something fun that I made. 


My outfit fits all of those requirements and it gives me a fun vibe. Polka dots and hot coral are so much fun, even if I'm an adult.

The top is made with brushed poly from Pretty Posh Prints. I am loving the brushed poly craze that has taken over the sewing world. It is incredibly soft and easy to work with. I have also used it for leggings, which are easily my favorite!

The skirt is made from liverpool from Knitpop. Liverpool is very stable and easy to sew. It is a heavier fabric, which makes this skirt feel expensive even though it cost me about $10 in materials. 

It also has great (2 way only) stretch! 


I think I will start recommending this skirt pattern to everyone who needs a beginner project. It is so fast and easy to sew. It took me about 30 minutes, including printing, taping and cutting out the pattern. That's crazy fast, especially considering I'm not a fast sewer myself.

It comes in both maxi length and knee length, has a few different waistband options, and the best part? There is a discount code available to facebook group members which allows you to get the skirt for free. Yep, it's a free pattern. You can join the group here if you want to take advantage of it. (Read the pinned post to find the code. The code is for group members only, so don't share it outside of the group.)

The pattern is drafted to sit at the preferred waist, where an average pair of pants would sit. I, however, wanted to make them high waisted, so I added 4" to the rise of the skirt. I measured the difference between my preferred waist and my natural waist to know how much to add. 


I have a secret. 

I still haven't hemmed the skirt. Shhh! 

I was going to do it, and then realized if I kept in unhemmed, maybe I could wear slippers under the skirt and no one would know. 

Or maybe I haven't yet because I'm lazy. 

(You caught me. That's the real reason.) 

I will get around to it soon.


I also slightly modified the shirt pattern: 

The options in the pattern are for shirt and tunic length, both banded or hemmed but I wanted it cropped so I cut the pattern where I wanted it. I also made the sleeves elbow length, instead of 3/4 length. The pattern has options for a tank, short sleeves, 3/4 length sleeves, or long sleeves. 

This pattern is meant to be a fitted top, which can easily be worn as an underlayer. 

It has a lot of options! Check out the pattern here. 

I probably should have graded out for the waist, which is a common modification I have to do for my clothes, especially if they are fitted. I am pear or spoon shaped and I love being able to sew patterns for my body instead of sticking with standard sizing. 

I am planning on making a few tunics next, and I will make sure I grade the waist out to get the perfect fit. I'm pretty excited about the possibilities of this pattern!


Thanks for stopping by! Don't forget to check out the other looks in the series! Here is a schedule of all the other great blogs to help inspire your holiday sewing:


Nov 17 - It's Liesel / Stitching and Making / Sewn of a Stitch

Nov 18 - I'm Just Like Mommy / Lady and the Gents / The Crunchy Mommy / SewSophieLynn

**There are affiliate links in my post. I receive a small compensation for any purchase you make using an affiliate link. I have a sewing addiction, so I greatly appreciate it.**

Friday, October 21, 2016

Love Notions' Margot and Maggie Peplum

Love Notions released two new patterns today: the Margot and the Maggie Peplum. Both are the same design with the same options, but the Margot is for ladies (sizes XS-XXXL) and the Maggie is for girls (sizes 2T - 16). There are also available for purchase bundled together here. (Included links are affiliate links.)

I was hesitant to try it at first because I tried sewing myself a peplum a few years ago and it wasn't love. I felt kind of awkward in the shape. Granted that was when I was first learning to sew for myself instead of my kids, so there could have been some user error on my part. Regardless, I didn't think that it was the right style for me.

I was intrigued by the options in this particular peplum pattern, so I decided to throw caution to the wind and try it out anyways.

And I'm so glad I did!


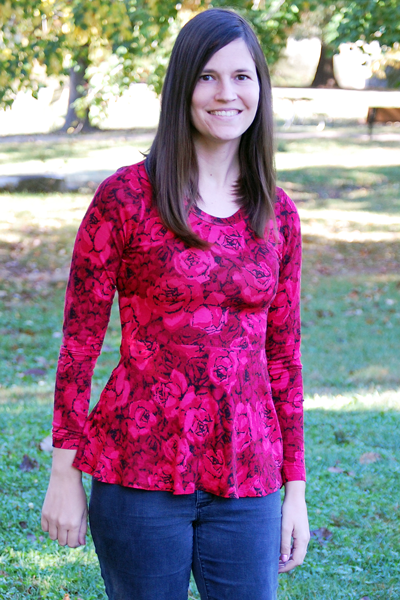
This is my final version in rayon spandex. It has excellent drape, and I love the way the peplum hangs in this fabric. A more defined peplum could easily be achieved in a more structured and heavier knit like scuba, liverpool, or ponte if that is your preference.


This seriously has the comfort of a t-shirt, yet I feel put together wearing it. I might need a few more of these! I'm a peplum convert now.


I was very thankful that the pattern included instructions and tips on achieving a great fit. I was worried about where to lengthen to get the waist seam to hit at the most flattering spot and the instructions address that. Instructions for doing a full bust adjustment for both the solid and princess seamed bodice are also included in the Margot pattern and instructions for blending sizes for height are included in the Maggie pattern.

The rayon top I made in the pictures above was sewn from the final version of the pattern, with the solid bodice and the swing skirt.

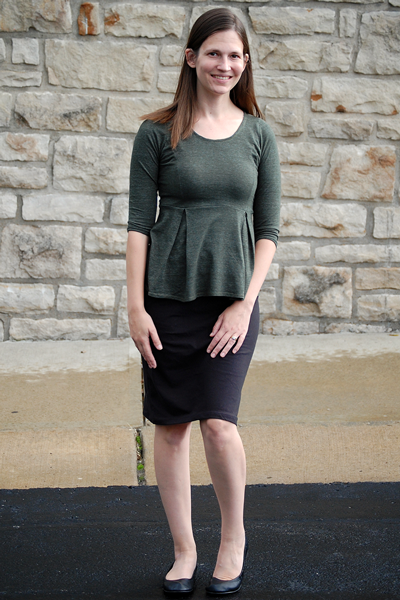
I also made myself another peplum top from an early version in testing. The pattern has since been tweaked to achieve a better fit but I will still get a lot of use in this one. I definitely should have lengthened this one. (I am 5'7" and the pattern is drafted for 5'5") But I will be able to wear it with high waisted skirts or pants.

I don't know what I was thinking, I always lengthen my shirt patterns, but oh well. I'll still get a lot of use out of it.


This one was a rayon knit, with only two way stretch, with the princess seams and the pleated skirt. The pleats on the the skirt match up with the princess seams in all sizes.

And speaking of those princess pleats, there are some fun colorblocking opportunities there! This is Eve, modeling the Maggie in colorblocked princess seams and the pleated skirt.


I love all the options! They include:

-Four sleeve lengths: long, 3/4, elbow, or short.
-Two bodice options: solid or princess seams.
-Three skirt options: swing, pleated, or gathered.

I've been holding off on the best part. Today only, this pattern is on sale for 50% off. That's very generous for a new release! Tomorrow, the price goes back to the special price for new releases, still on sale but not as low as today's price.

In fact, ALL of Love Notions' patterns are on sale for 50% off. You check them all out here. These are some of my favorite patterns!