Friday, March 31, 2017

New Pattern: Olympia Dress by Love Notions

I am so excited about today's post. I get to share my new favorite dress with you today! 

Introducing the newest pattern by Love Notions: the Olympia Dress*! (affiliate link)

 (Sewn with Rayon Spandex from Simply by Ti.)


Just how much do I love my new dress? Well, a few days after I made it, there were thunderstorms in our area and we were under a tornado watch. I took this dress out of the closet in my bedroom and hung it up in the closet in the middle of the house under the stairs. That's our designated area for us to hang out in, in the event of an actual tornado. The storms didn't amount to much, and there was no tornado, but my dress was hanging in the closet just in case we needed to rush in there at the last minute. It would have been safe with us. That's how much I love this dress. I've never done that with any other article of clothing before, ha!

The dress fit is spot on, and I really like the shape on me. There are four different cup sizes included in the pattern for each of the sizes (XS-XXXL) to make it easy for you to get the perfect fit right from the start! If you usually have to do a FBA (full bust adjustment) you shouldn't have to do one unless your sewing cup size is bigger than DD. It is important to note that your sewing cup size might not match your actual bra size. The sewing cup is measured by the difference between your over-bust and your full bust as opposed the difference between your full bust and your under-bust. 

Other features of the pattern include:

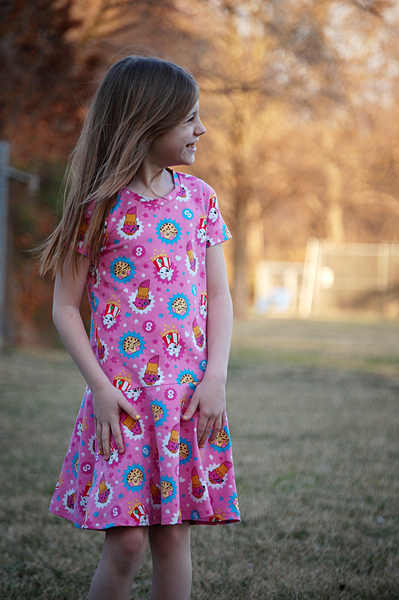
- V-neck with shawl collar. I love wearing v-necks but don't enjoy sewing them. This design, however, is genius and the v-neck is integrated when sewing the bodice pieces together.

- 5 sleeve lengths, including sleeveless.

- Knee length or maxi length skirt. The skirt is roughly a quarter circle skirt. I love the shape of it and I love that there aren't gathers to deal with and that it's not a full fabric hogging circle skirt. 

-Optional side seam pockets. The pockets are cut out with the skirt as one piece, which makes adding pockets so much faster! I might be doing this with all my side seam pockets from now on. 


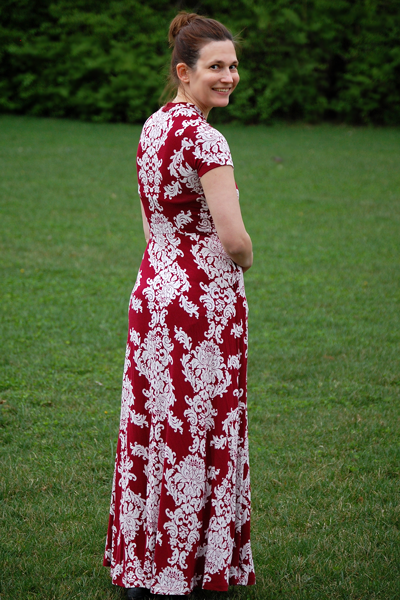
Because of the busy print and the fact that I fussy cut my fabric to get the seams to match up well, it's hard to see the seams on my dress. There is a seam down the middle of the front bodice, across the waist where the skirt is attached, and down the middle of the back skirt piece. (The one on the back skirt piece is simply to conserve fabric, you could cut that one on the fold if you had plenty of fabric to spare.) You can see these seams more clearly in the line drawings in the pattern listing here*. (affiliate link.)

This dress was made in testing with the final version of the pattern. I also made another dress from an earlier version during the pattern test. I used a royal blue liverpool fabric (from Pretty Posh Prints) and it's a little easier to see the lines of the dress in the solid color. 


Even though this dress was made from an earlier pattern version which has since been tweaked to fit even better, I will still wear this dress a lot. I kind of feel like a 1950s housewife wearing it, but I did warn my husband not to get any ideas. I'm glad he totally gets my sense of humor!

The liverpool is firmer than the rayon spandex, so the collar is a little more structured. I don't think I have a preference there, but it's worth noting. Here are the front and back pictures of the neckline/collar in both fabrics:


I love both of the dresses a lot, but if I had to choose one, I would pick the rayon spandex version. That was probably an obvious answer since it's the one I put in the tornado safe zone! I kind of feel more attached to it because of the time I spent fussy cutting the front bodice and skirt. And I love how breathable rayon spandex is during the hot days of summer. But then again, I love the structured look of liverpool! And the color makes me happy. It's safe to say I will be wearing both of these dresses frequently. 


If you want to make yourself an Olympia dress, the pattern can be found here*. (affiliate link) The introductory sale price is good through April 1st. If you make one, I would love to see it! Love Notions has an active facebook group where you can share your creations!

Both Simply by Ti and Pretty Posh Prints have facebook groups in addition to their online stores where you can usually find more deals. You can find the groups here and here

*There are affiliate links in my post. I receive a small compensation for any purchase you make using an affiliate link. I have a sewing addiction, so I greatly appreciate it. All opinions are my own and I do not promote a pattern I do not love.


Thursday, March 30, 2017

New pattern: Lola Dress and Tunic by Peek-a-Boo Pattern Shop

I have a very sweet pattern to share with you today. Introducing the Lola Dress and Tunic by Peek-a-Boo Pattern Shop.  (affiliate link*)


I should note that this pattern was sewn up during testing and this was the first version. The final version is adjusted a little bit to fit even better, but it was just about perfect from the start so this little tunic will be worn a lot! In the final version, the keyhole lays better and the front is adjusted so that it doesn't pull towards the back. But like I said, it was very minor fixes. 


This is the size 18 months for my 20 month old, Mabel. She wears 18 months in RTW (ready to wear) clothing and fits in the size chart perfectly for 18 months in this pattern. Unlike my other three children, she is not tall for her age so I didn't have to do any height adjustments. It was very nice to be able to sew a pattern straight from the printer with no adjusting. 

I used a stretch chiffon from Joann, but honestly I'm not sure why it was labeled that way. There really isn't any stretch. There is some give in the fabric, but no real stretch. The pattern calls for a woven fabric (no stretch required) with drape and this fits the requirement perfectly. You might have seen this fabric on my blog here and here. But now I have used up every last piece of my 2 yard cut, so this will be the last time it makes on appearance here. 

The pattern includes options for either a high-low tunic or a curved hem dress. Three sleeve options include cuffed button tab, finished with bias tape, or hemmed. The sleeve is a dolman cut, which makes for a fast and easy sew, but also makes it essential that the fabric used have some drape to it. 

I sewed the high low tunic with the button tab sleeves:


The neckline is finished with bias tape and I choose to use the same fabric to make my own, but you can always buy premade bias tape. I find it easy to make my own, and I like that it blends in with the rest of the fabric.


The back features a buttoned keyhole closure:


I should also note that Mabel is the absolute worst model, haha. I had some candy on me and she cooperated fine for about five minutes because of the candy. Also because she was laughing that my sister was putting her stuffed bunny on my head. I'm thankful that she at least gave me five minutes of cooperating for pictures. 

Here she is laughing at the bunny on my head:


And here she is running away from me, laughing all the while because I had to chase her: 


And here she is giving me a "look." Although she was probably mad at me for something, but I'm going to pretend it's a model look. Such a pretty little moody model.


And finally here she is after just a few minutes of taking pictures, climbing into her stroller and saying "all done":


She's so funny, I think I'll keep her. 

As for the pattern, I think I'll keep it too. I have so many knit patterns already, it's nice to add a simple woven pattern to my collection for a change. I am picturing some floral rayon challis dresses this summer and some plaid dresses come this fall! This would also be very cute in chambray. The key is using fabric that has good drape because of the dolman cut and the shape of the tunic/dress, and all of those fabric would be excellent choices. 

The pattern is currently available to purchase here, and has an introductory sale price today only. You can view it here*.

*There are affiliate links in my post. I receive a small compensation for any purchase you make using an affiliate link. I have a sewing addiction, so I greatly appreciate it. All opinions are my own and I do not promote a pattern I do not love.

Tuesday, March 21, 2017

PRP: Boho Chic

This week's Project Run and Play theme is Boho Chic. 


Boho chic is not  normally a look that I'm drawn to, although I do enjoy seeing other people pull off this style. I just don't feel that it fits me very well personally. I honestly wasn't sure if I would participate this week, but what I love the most about Project Run ad Play is the challenge, so I kept thinking about what I might make this week.

Finally I remembered this maxi skirt that I had tucked away in my closet. 


It's a flowy, tiered with gathers, woven maxi skirt that I bought back in college. I love the skirt, but I rarely wore it because it was only held up by a drawstring, which didn't do a good job. Let's just say pulling it up all the time was a pain.

The print of the skirt has a boho vibe and so does the light airiness of the fabric. I cut it up to make an off the shoulder flowy dress for my daughter Eve. I used almost every square inch of the skirt and am thrilled with how it turned out!

I used the Daphne pattern by Made for Mermaids (affiliate link). The only difference I made was keeping the gathered tiers of the original skirt, so the shape is a little different than if I would have used the pattern exactly. I did trim down the side seams, cutting it out with the pattern, but because it has all those gathers, it is fuller than the original pattern. 


I kept the hem on the skirt, which had a tiny lace hem. 


To match the hem, I took some white lace trim, dyed it with strong tea and used it on the hem of the bodice flounce.


The two lace hems ended up matching pretty well!

The dying process was very simple. The lace trim started out white:


Then it went into a very strong batch of tea for an hour or two.


And tada! Out it came, almost the exact same color as the original trim of the skirt:


Back to the rest of the dress construction...

Because the fabric is so lightweight, it is a bit see through in the light. The original skirt had a lining that didn't go quite to my knees. I cut that lining out and sewed it to the seam allowance of the highest gathered tier. Because it's on the seam allowance on the inside, there is no stitching visible on the outside of the dress. With the lining, it's no longer see through.

Here is Eve showing off the lining and where it is attached to the inside of the dress.


One thing I really like about this style is that it can be worn two ways. Eve can wear it off the shoulders:


Or she can pull it up over her shoulders, whatever she is more comfortable with. It just looks like a curved neckline this way. 


She prefers the off the shoulder look though. 


Her older sister, Kylie, also loves this dress and has begged for me to make her a dress with this pattern soon. While I may not be drawn to wearing this style, my daughters certainly are. I am happy making them clothes they love, so I will definitely use this pattern again. 


Monday, March 20, 2017

Color Me Lucky


Do you pay attention to the Pantone color of the year? I'm always curious to see what they predict as THE color of the year. I don't know why, but I've always been intrigued by it!

So naturally, I'm thrilled to be a part of the "Color Me Lucky" blog tour hosted by Sewing by Ti which revolves around the Pantone color of the year and the coordinating palettes.  There has been a lot of great inspiration so far in the blog tour!

Today is my turn and I knew right away that I wanted to use this colorful liverpool fabric. I bought this a year ago from Pretty Posh Prints and was hoarding waiting for the perfect project to use it.


This year, the color of the year is "greenery." 

Photo credit: https://www.pantone.com/color-of-the-year-2017

It's a pretty cheerful green, and kind of reminds me of a lighter, playful kelly green. 

You can find a lot of different palettes on the Pantone website to help inspire you to coordinate colors either for decorating or for fashion. I noticed that the following palette, Moody Blooms, included several colors that were in my fabric. They may not be an exact match, but they are pretty close.

This color pairing and others found at: https://www.pantone.com/color-of-the-year-2017
Winter Bloom, Greenery, and Scarlet Ibis are all three represented in my fabric. I thought about trying to find a different color in the same scheme to use as a solid coordinate, but in the end I went with a neutral to tone it done a little. I still might try to hunt down the Red Dahlia color somewhere, I am drawn to it a lot!

The fabric pretty much told me that it wanted to be a pencil skirt and who am I to argue with that?


Excellent choice fabric! I should listen to my fabric more often. 

I used the Pencil Skirt pattern by Patterns for Pirates, which is free for their Facebook group members. Join the group if you want to find out how to get it for free. It is a very fast sew with several options. 

I have sewn a couple other pencil skirts before but had to take them in on the side seams because the skirt hung straight instead of hugging my curves. I don't have a lot of curves, so I want to show off the ones I do have! This was my first time sewing this particular pattern and it was perfect without any alterations. I will make more P4P pencil skirts in the near future. 

I went with the below the knee length and the taller rise. However, I have a long torso with a high waist, so it sits pretty high on me and the hem doesn't go past my knees. I could have added some length, but I like the hem where it is.

Here is me awkwardly showing you how tall the high rise option is:


There is a shorter rise option in the pattern, but I prefer higher rises as my natural waist is pretty high. 

I paired the skirt with my grey rayon jersey La Bella Donna shirt (pattern by Love Notions). I had made this shirt a while ago and I have worn it too many times to count. It's a great neutral in my closet so I wear it with lots of different outfits. 

I have the shirt tied with a matching rubber band, but I think I need to add some "real" tie shirts to my wardrobe soon.

I do want to also show off the hem. One of my favorite things about liverpool fabric is how easy it is to work with, including hemming with a double needle. Certain fabrics give my double needle a headache skipping stitches here and there, making me adjust the tension just right, but I have never had any issues using a double needle on liverpool. 


With that, I will leave you with a few more pictures of my "Color Me Lucky" outfit. 

If you want more color inspiration, be sure to check out the rest of the blog posts on the tour:

Wednesday, March 1st Sewing By Ti, Hazelnut Handmade
2nd Crafty Like a Rox
3rd Sewing By Ti

Monday, March 6th Tenille's Thread
7th Harper + Lu
8th Creamer and Chaos
9th Sewingly, Michelle
10th Sewing By Ti

Monday, March 13th EYMM
14th Harper + Lu
15th Sprouting Jube Jube
16th Very Blissful
17th Doodle Number 5

Monday, March 20th Ma Moose
21st On Wednesdays We Sew
22nd Robynne and the Bobbin
23rd Crafty Like a Rox
24th Sewing By Ti

Monday, March 27th Rebel and Malice
28th Lulu & Celeste
29th Robynne and the Bobbin
30th Anne-Mari Sews
31st Margarita on the Ross


Thursday, March 9, 2017

New Pattern: Prisma Dress

Introducing the newest pattern from Love Notions: the Prisma Dress. (aff. link)


I made both of these dresses for Eve during pattern testing. She is one happy girl, I can't remember the last time I sewed something for just her. She usually gets her older sister Kylie's hand me downs and doesn't need me to sew her as many clothes. She also has less fit issues than her older sister, so I sew more for Kylie out of necessity as clothes off the rack just don't fit her very well. 

Well lucky Eve. Not only did I make her two dresses, but one of them is made with Shopkins fabric.

It's safe to say she is a bit Shopkins obsessed. Please don't ask me how many she owns, I don't even want to know. I think I counted about thirty on her bed alone as I tucked her in tonight. Yes, she sleeps with some of them, and yes, she has lots more. It's pretty much all she has received for her past birthday and Christmas presents, and she couldn't be happier about it. 

Eve told me that she was the *only* girl in her *whole* class who didn't have a single Shopkins outfit. Poor little Eve. At least she has this dress now. 


We are both very happy with the outcome of these dresses!

The pattern, drafted for knit fabric, includes three skirt options and three neckline options, meaning you could make nine dresses from the pattern and they would all be different. There are also two pocket options, but I didn't do any pockets this time. Three sleeve lengths are also included. 

Skirt options:
- A-line dress (all one piece, no skirt attachment)
- Pleated drop waist skirt
- Swing drop waist skirts

Neckline options:
- Band
- Peter Pan Collar
- Button Boatneck

The shape of the dress for all options is A-line and the skirt options are both drop waist. I have other dress patterns that have a tighter fitting bodice and with a higher skirt, and I don't have any patterns with a shape like this one. I'm very happy to add this pattern to my collection!

With the a-line shape, the dress hangs so well and it is very easy to wear and move in. 

I just love the shape of this dress and how it hangs. 


It's also great for twirling. Obviously the A-line option wouldn't twirl as well, but the flared and pleated skirt both have a lot of movement. 


I did not sew the peter pan collar or a-line dress, but I did the other options. 

Button Boatneck Neckline:


Banded Neckline: 


Drop waist pleated skirt:


Drop waist swing skirt:


Fabric for both dresses was from Joann. The Shopkins fabric is cotton lycra and the light blue is interlock. 

In addition to those two dresses, I also used the boatneck option to make Kylie a shirt, which I blogged about yesterday. You can see more pictures here. It was very easy! The only change I made (besides the length) was to take it in on the sides a little bit so that it wasn't as A-lined. 

I also have another dress cut out to sew up soon. I just can't stop using this pattern and I've only had it a little over a week! 

If you want to see more pictures of the different options and all the beautiful dresses sewn up by the other pattern testers, or if you want to buy the pattern to make some fun dresses yourself, you can see the listing here. (aff.link)

I do want to give a shout out to Eve for taking pictures in crazy windy conditions. It was quite blustery outside and we did have to take our time and wait for those few seconds where the wind calmed down to take one or two fast pictures. And the wind was chilly. Thankfully she was a trooper!

But of course, she is also my crazy Everz and she did give me quite a few funny pictures. This one might be my favorite and I just can't not share it. :)


*There are affiliate links in my post. I receive a small compensation for any purchase you make using an affiliate link. I have a sewing addiction, so I greatly appreciate it. All opinions are my own and I do not promote a pattern I do not love.