Sunday, November 20, 2016

Whistler by Love Notions

Brrrr... I don't know about where you live, but here in Kansas, it just got cold overnight. 

I won't lie and pretend I'm happy about it, but the fact that I just finished sewing two cozy pullovers makes me hate this change in weather a little less. 

Just a little. Don't get me wrong, I'm still counting down the days until the 90+ degree temperatures come back. 

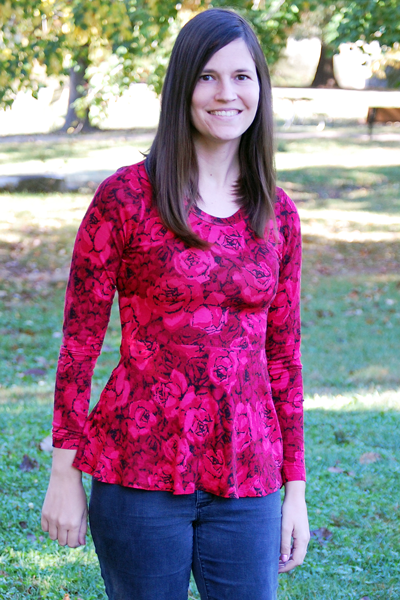
But if I must be out in the cold, at least I can do it wearing this:
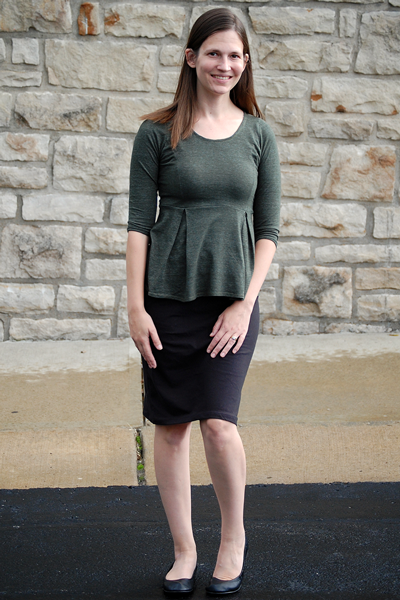

Or this:


This is the newest pattern by Love Notions: The Whistler Pull-over by Love Notions

I helped test it, and I'm so glad I did. I am probably going to wear both pieces a lot this winter. If you see me a lot, you might get sick of seeing them. Too bad for you, because I doubt I get sick of wearing them.

The pattern is for a loose fitting pullover, meant to be able to be worn over light layers. I just wore mine over a cami, but I could also wear it over a tee if I wanted to.

There is a shawl or hooded version. I made both of mine with the shawl because I love it so much, but I will probably have to make a hoodie in the future too.

The front can be gathered or not. I stuck with the plain front on both because my fabric was very sturdy and heavy. Gathers would not have been a good option for my fabric, but if I make one in a lighter fabric, I might give that option a try.

The length options are hemmed (shortest), banded (slightly longer) and tunic (duh, this is the longest choice.) There is a finished measurement chart in the pattern and that includes lengths by size for each of those options, as well as instructions on how to lengthen or shorten the pattern. 

For my grey version, I made the tunic, in french terry from Joanns:


And for my red pullover, I made the banded length. I did add an inch to the length because I'm 5'7" and the pattern is drafted for a height of 5'5". I absolutely love this length, and feel comfortable wearing it with either leggings or jeans. Yay, more chances to wear it!

This is actually a Ponte De Roma fabric from Walmart. I normally don't buy fabric there, but I always glance at it. 

Just in case. 

It's totally normal to go look at fabric just in case, right? Well, I'm glad I did. I'm very happy it, it has a nice weight and feels soft.   


The design is genius. 

You might have noticed my hand in my pocket in a lot of pictures so far. 

Yes, this pullover has pockets. And they fit right in with the design of the sweater. 

When I first saw the line drawing, I wasn't sure how the pockets would function. I was wondering if they would be large or bulky, but they are actually the perfect size. Not too huge where I would lose a million things in them, but big enough for my phone, or my keys, or even my credit card. I hate taking a purse anywhere, so this might become my grocery store day shirt. 

Here is one of the pockets inside out:
Check out my cute pocket!

The shawl piece (or hood) is closed with two buttons. The instructions have you construct buttonholes so that you can open the shawl piece while dressing, but I couldn't find my buttonhole foot so I just sewed my buttons though both shawl layers. There is still a big enough opening to get it on and off easily, so it works just fine if you aren't a fan of sewing buttonholes. 

However, I think that this would be a great shirt for nursing in if you made it with the buttonholes! I don't need a nursing shirt anymore, but if I did, I would have searched for that lost foot a little more.

Hard to see, but I used wood buttons for both of my pullovers. 

To be completely honest, I was nervous about the construction of this pattern at first. The shawl, the curves, the cute pockets... I wasn't sure if I was getting in over my head. 

But the construction was actually a breeze and there is even a video in the pattern to help. My second one went together in about an hour to an hour and a half (not including cutting time, because I'm a  slow cutter.)

I feel extremely comfortable wearing both of my new pullovers. I will make more!

And just to prove how much I hate the cold, here is picture from the photoshoot, I was obviously not enjoying the weather at the moment. This was a fun one to see when I was looking through the pictures later. 


But at least I had pockets, that made it better.


If you want to make your own Whistler, you can buy the pattern here. It's on sale through Thursday and the sale price is lower now than it will be on Black Friday!


**There are affiliate links in my post. I receive a small compensation for any purchase you make using an affiliate link. I have a sewing addiction, so I greatly appreciate it. All opinions are my own and I do not promote a pattern I do not love. **

Wednesday, November 16, 2016

Sew what do I wear? Holiday Edition

Hello mermaids, pirates and other fellow sewing friends!


I am thrilled to be a part of the blog series "Sew what do I wear?" hosted by the pattern companies Made for Mermaids and Patterns for Pirates.

This is the Holiday Edition of the series. Need some inspiration for an outfit to wear over the Holidays? Maybe you have family pictures, a holiday party, or a work event and you need a new outfit? 

If so, you don't want to miss all the blog posts in this series! And if not, check them out anyways, because staring at beautifully sewn outfits is always a good time. Hopefully your creative juices will be inspired either way.

Today is the third day of the series. Days 1 and 2 can be found here and here.

I decided to create an outfit for family gatherings that will inevitably happen over the holiday season. 

Sew, what do I wear for the family gatherings? 


Honestly, my family wouldn't care if I showed up in pajama pants and a t-shirt. I mean, I might know from experience. I plead the fifth.

But as all of our individual families grow larger, it seems like the times all of the larger family, aunts, uncles, cousins, sometimes second cousins and people twice removed (or whatever that means) get together gets more spread out. So I wanted something I could wear that looks more put together for a large family gathering. 

I did have other requirements as well, such as:

-I want to be comfortable. I will be chasing after four kids, two of those being busy toddlers. We also play games and sometimes get pretty active. There might be an intense game of spoons and I need to be prepared. I'm not going to lose because of poor mobility. No way.

-I don't want to shave my legs. It's winter, come on, let's be real.

-I want to be able to show off something fun that I made. 


My outfit fits all of those requirements and it gives me a fun vibe. Polka dots and hot coral are so much fun, even if I'm an adult.

The top is made with brushed poly from Pretty Posh Prints. I am loving the brushed poly craze that has taken over the sewing world. It is incredibly soft and easy to work with. I have also used it for leggings, which are easily my favorite!

The skirt is made from liverpool from Knitpop. Liverpool is very stable and easy to sew. It is a heavier fabric, which makes this skirt feel expensive even though it cost me about $10 in materials. 

It also has great (2 way only) stretch! 


I think I will start recommending this skirt pattern to everyone who needs a beginner project. It is so fast and easy to sew. It took me about 30 minutes, including printing, taping and cutting out the pattern. That's crazy fast, especially considering I'm not a fast sewer myself.

It comes in both maxi length and knee length, has a few different waistband options, and the best part? There is a discount code available to facebook group members which allows you to get the skirt for free. Yep, it's a free pattern. You can join the group here if you want to take advantage of it. (Read the pinned post to find the code. The code is for group members only, so don't share it outside of the group.)

The pattern is drafted to sit at the preferred waist, where an average pair of pants would sit. I, however, wanted to make them high waisted, so I added 4" to the rise of the skirt. I measured the difference between my preferred waist and my natural waist to know how much to add. 


I have a secret. 

I still haven't hemmed the skirt. Shhh! 

I was going to do it, and then realized if I kept in unhemmed, maybe I could wear slippers under the skirt and no one would know. 

Or maybe I haven't yet because I'm lazy. 

(You caught me. That's the real reason.) 

I will get around to it soon.


I also slightly modified the shirt pattern: 

The options in the pattern are for shirt and tunic length, both banded or hemmed but I wanted it cropped so I cut the pattern where I wanted it. I also made the sleeves elbow length, instead of 3/4 length. The pattern has options for a tank, short sleeves, 3/4 length sleeves, or long sleeves. 

This pattern is meant to be a fitted top, which can easily be worn as an underlayer. 

It has a lot of options! Check out the pattern here

I probably should have graded out for the waist, which is a common modification I have to do for my clothes, especially if they are fitted. I am pear or spoon shaped and I love being able to sew patterns for my body instead of sticking with standard sizing. 

I am planning on making a few tunics next, and I will make sure I grade the waist out to get the perfect fit. I'm pretty excited about the possibilities of this pattern!


Thanks for stopping by! Don't forget to check out the other looks in the series! Here is a schedule of all the other great blogs to help inspire your holiday sewing:


Nov 17 - It's Liesel / Stitching and Making / Sewn of a Stitch

Nov 18 - I'm Just Like MommyLady and the Gents / The Crunchy Mommy / SewSophieLynn

**There are affiliate links in my post. I receive a small compensation for any purchase you make using an affiliate link. I have a sewing addiction, so I greatly appreciate it.**

Friday, October 21, 2016

Love Notions' Margot and Maggie Peplum

Love Notions released two new patterns today: the Margot and the Maggie Peplum. Both are the same design with the same options, but the Margot is for ladies (sizes XS-XXXL) and the Maggie is for girls (sizes 2T - 16). There are also available for purchase bundled together here. (Included links are affiliate links.)

I was hesitant to try it at first because I tried sewing myself a peplum a few years ago and it wasn't love. I felt kind of awkward in the shape. Granted that was when I was first learning to sew for myself instead of my kids, so there could have been some user error on my part. Regardless, I didn't think that it was the right style for me.

I was intrigued by the options in this particular peplum pattern, so I decided to throw caution to the wind and try it out anyways.

And I'm so glad I did!


This is my final version in rayon spandex. It has excellent drape, and I love the way the peplum hangs in this fabric. A more defined peplum could easily be achieved in a more structured and heavier knit like scuba, liverpool, or ponte if that is your preference.


This seriously has the comfort of a t-shirt, yet I feel put together wearing it. I might need a few more of these! I'm a peplum convert now.


I was very thankful that the pattern included instructions and tips on achieving a great fit. I was worried about where to lengthen to get the waist seam to hit at the most flattering spot and the instructions address that. Instructions for doing a full bust adjustment for both the solid and princess seamed bodice are also included in the Margot pattern and instructions for blending sizes for height are included in the Maggie pattern.

The rayon top I made in the pictures above was sewn from the final version of the pattern, with the solid bodice and the swing skirt.

I also made myself another peplum top from an early version in testing. The pattern has since been tweaked to achieve a better fit but I will still get a lot of use in this one. I definitely should have lengthened this one. (I am 5'7" and the pattern is drafted for 5'5") But I will be able to wear it with high waisted skirts or pants.

I don't know what I was thinking, I always lengthen my shirt patterns, but oh well. I'll still get a lot of use out of it.


This one was a rayon knit, with only two way stretch, with the princess seams and the pleated skirt. The pleats on the the skirt match up with the princess seams in all sizes.

And speaking of those princess pleats, there are some fun colorblocking opportunities there! This is Eve, modeling the Maggie in colorblocked princess seams and the pleated skirt.


I love all the options! They include:

-Four sleeve lengths: long, 3/4, elbow, or short.
-Two bodice options: solid or princess seams.
-Three skirt options: swing, pleated, or gathered.

I've been holding off on the best part. Today only, this pattern is on sale for 50% off. That's very generous for a new release! Tomorrow, the price goes back to the special price for new releases, still on sale but not as low as today's price.

In fact, ALL of Love Notions' patterns are on sale for 50% off. You check them all out here. These are some of my favorite patterns!

Thursday, September 29, 2016

Pattern Review: Refined Raglan by Winter Wear Designs


Raglan lovers rejoice... There is a new raglan pattern in town!

I'm sure by now you have a favorite raglan pattern, but this one is different. It's drafted for wovens.

Yes, a woven raglan pattern!

I was immediately intrigued when I heard about it and I jumped at the chance to help test the pattern. 

I sewed two different versions while testing: one in a bright floral chiffon and another in a non-stretch sweatshirt and a plaid flannel. 


As you can see, it's two different looks from the same pattern. One for spring and one for fall!

 And I feel like I'm barely unlocking the possibilities in this pattern... I can't wait to play around with it some more.

The options include 3 different sleeve lengths (short, 3/4 and long), optional side vents, several options for the front (standard, pleated or open) and three neckline finishes. 

All finishes for the neckline use bias tape, either single or double fold and instructions for making your own are included in the pattern.

The fit is relatively roomy, especially if you are used to knit patterns as I am. The armscye is relaxed and there is plenty of room for easy mobility. Yet the shape is flattering, with a defined waist and any less ease would make dressing and undressing a bit difficult. There are no closures on the shirt anywhere so this is important. :)

All views have a curved hemline. I sewed one with side vents and one without:


The chiffon top was an earlier version in testing, which has since been revised to add a little more ease in the back for mobility and to adjust the neckline based on tester feedback at that time.

I still loved this version and will wear this a lot! But with fall approaching it might look a little out of place, so I might have to hold on to it until spring. It's so light and flowy, I'm sure I will love this on hot summer days as well. 


I graded out for my waist and hips in the chiffon version, from a small to a medium. 

I felt like I had more than enough ease, so I did not grade out for my size in the next version, which was the flannel and non-stretch sweatshirt shirt: 


I felt like the fit was great, even without grading out for the waist and hips to the next size. The finished measurements as well as the measurements the pattern is drafted for are both included in the pattern, so you if you might be able to get away without grading if you normally need to grade. Just keep in mind you will want more ease for a woven pattern than for a knit pattern.

I didn't make any changes to the final pattern except for adjusting for height. The bustline and waistline are clearly marked in the pattern, which helps a lot if you do need to make adjustments. I cut along the waistline to add length to the pattern.

I seriously love this version! It fits so well and I have full range of mobility wearing it. We were asked in testing to make sure we could reach our arms all over the place, haha. 

I might adjust the neckline to have less of a scoop in my next version, but that is a personal preference. 

Or I might not, I'm lazy sometimes.

The only other differences in the two shirts that I made, besides the obvious different sleeve length, was the way I finished the neckline. The chiffon one is finished with a single fold bias tape (making it not visible on the outside of the garment) and the plaid/sweatshirt is finished with double fold (I really wanted to show off that plaid some more!)

I will definitely use this pattern again. I'm hoping next to make one with denim or chambray next, maybe lengthened to a tunic. With so many different types of woven fabrics, there are so many different look possibilities!

You can find the pattern, the Refined Raglan by Winter Wear Designs here: 

https://www.winterweardesigns.com/collections/womens-patterns/products/refined-raglan-for-women-size-xs-xxxl


Wednesday, September 14, 2016

PRP Week 1: Pokemon Go Challenge

Another season of Project Run and Play is here! I always try to sew along if I have time. I love the push it gives me to sew creatively. 

This week the theme is Pokemon Go Inspired. 

I will admit that I am hooked on playing Pokemon Go. When it first came out, I didn't think it would be something I was interested in, but I downloaded the game anyways so that my Pokemon obsessed daughter, Kylie, could play. Little did I know how much I would love it! 

My husband is equally as obsessed and we may, or may not, have gone Pokemon Go hunting on dates. That's normal, right?

I wasn't sure if I would have time to participate in the first week of Project Run and Play (maybe too much Pokemon Go hunting, ironically?) but Sunday night, the day before the new season kicked off I decided I should make something. My oldest is Pokemon obsessed after all. 

I didn't make up my mind until that night, after the kids were in bed, so I was limited on time and also on what fabrics I already had in my stash. I did have Pokemon fabric, but as this is an inspired challenge, I wanted to think outside the box in true Project Run and Play fashion.

This is the look I came up with:


What? How is that Pokemon inspired? 

I'm glad you asked. I pulled my inspiration from a colorful, slightly funky, but beautiful Ivysaur:


Here are the design elements I noticed on Ivysaur:
-floral
-triangles
-color scheme: pink, green and blue.

I already had the perfect pants that I made during testing for the Summer Caye pattern by Love Notions. (aff link.) I hope it's ok I included the pants that I had already made in this look, but either way I'm doing it anyways, because

1) I was short on time. 

2) I'm not a real contestant, just sewing along for fun, so I don't think I have an hard rules.

The shirt is the Tidal, (aff. link) also from Love Notions and is what I chose to sew up very quickly Sunday night. 

I choose it because the princess seams on the front of the shirt give the front panel a triangular shape, if you imagine that the tip of the triangle is cut off. The back fabric wraps around to the front, and from the front of the shirt also look like triangles.


I used a green slinky knit fabric that I have had in my stash since I started sewing years ago. This was purchased on one of my very first JoAnn fabric shopping trips!

I honestly don't know for sure what it is. I loved how it felt when I bought it years ago and didn't pay attention to content. If I were to guess now, I would say there might be some rayon in there, because of how it drapes, but honestly from JoAnn, I would be surprised if it wasn't polyester.

The floral fabric is a stretch chiffon. Yes, a woven! This pattern is drafted for knits, but I had success with using a woven for the front only. Although the fabric name includes stretch, let's be real, it only has a tiny bit of give. At the most, this is 3% stretch.

I didn't alter the pattern except for taking slightly smaller seam allowances to make up for the lack of stretch.

I would recommend making a muslin if you were to try use a woven for the front in this pattern. Or at least don't use your most prized or expensive fabrics before testing it out first. But honestly that should be said for every time you sew a new pattern. I didn't, because I am a sewing rebel. Plus I had enough fabric to make a new one should I have needed to tweak the pattern further.

Look at that drape! I love it!

Using more stable fabrics would highlight the shape a bit more, which is a sightly different look, but also fun.

I chose these capris because they are blue like Ivysaur's body and also have a triangular shape at the hem, which is the tulip hem option of the pattern.

I blogged about this pattern here. It's one of my favorites. I actually made Kylie four pairs of shorts in addition to these capris and myself two pairs of shorts, all this past summer. It's definitely a well used pattern here.

That concludes my Pokemon Go inspired look. You can see other fun looks at Project Run and Play.

Tuesday, September 6, 2016

Pattern Review: Perfect Layering Tee by Cole's Corner and Creations

I'm a sucker for a good basics pattern. So when I saw this basic layering tee loaded with options, I jumped at the chance to help test it.

How many options, you ask?

Length options: Shirt or tunic, either length has the option of being banded or hemmed.

Sleeve options: Tank top, short sleeves, 3/4 length and long. The tank is banded, the short and long sleeves have the option of being cuffed or hemmed, the 3/4 sleeve is finished with a hem.

Neckline options: The tank has a lower neckline than the other styles, although if you wanted a shirt of tunic with a lower neckline, you can use the tank neckline and it's corresponding band length. The neckline and arm bands have instructions for both a regular t-shirt style band and instructions for the same banded look but with hidden seams.

Phew, I think that covers all the choices you have in making this shirt (or tunic... or tank top.)

I sewed two different versions during testing. First a tunic, 3/4 sleeves, with a band instead of hemming. Let's be honest, I love it when I can get away without hemming. I should have hemmed the sleeves, but I used the cheater hemming method on my serger. Easy peasy.


Those Royal Blue leggings pictured are the Bonny Leggings by Made for Mermaids. Pattern is FREE with a code if you join their Facebook group. Leggings are so cheap to buy, but I still love sewing them because I can get a much better fit if I make them myself. These are size 3 for the waist, size 4 for the hips and the rise and length are size 7. You can't buy leggings like that in the stores!

The version I just shared, the tunic with the pink stripes, went through some changes before the final pattern. The sleeves were since slimmed down to get a better "layering" style tee.

From the final revised pattern, I sewed Eve a cuffed long sleeved, banded shirt length tee:


The fit in the final version is great! It's meant to be a close fitting tee that can easily be layered, under dresses, other tees... We are very happy with it:


Sorry for the picture overload, but Eve just looks so cute in every one, I can't help it.


A few more details about the pattern:

The pattern is layered, meaning you have the option of only printing your size. The pages are no trim for a fast assembly.

The front and back armscye are not identical and the sleeve is not cut on the fold. This might not mean much to you if you starting on your sewing journey, but this just means the armscye fit will be better than if the front and back were the same. It's not easy to find asymmetrical armscyes and sleeve heads in PDF children's patterns, so that's a win for this pattern!

There is a very wide range of sizes: 1/2 to 16 girls. There is also a separate pattern for dolls in sizes 15" and 18" and a pattern for Wellie Wishers dolls. I did not test the doll patterns.

The patterns are on sale (no coupon code needed) in craftsy and can be purchased here:


With that, I leave you with one more photo of Eve, who couldn't be any cuter if she tried.


Tuesday, August 30, 2016

Pattern Review: Canyon Cardigan by Love Notions

I recently had the pleasure to test a new pattern from Love Notions: the Canyon Cardigan (affiliate links.)

This pattern has a lot of options and I chose to sew up the A-line sleeveless view. It was a tough decision because I felt like the long sleeves or 3/4 sleeves would have been "safer" as it was more in my comfort zone. To be completely honest, I have never worn a vest before and I wasn't sure if I could pull it off.

I went with a stretch lace, which was also new for me, because hey, why not. 


I was very happy I chose to step out of my comfort zone! I feel like this is a piece I can wear a lot of ways, which can't be said for most of my clothing. I am wearing it over a tank top with skinny jeans in the pictures, but the fit is perfect for layering over long sleeves as well. It will also be easily worn with dresses or i could go the casual route with shorts and a tee. 


Besides the A-line view which is what I sewed, there is both a waterfall or a gathered view. And since each one of those options can be sewn with sleeves (long or 3/4) or as a vest, there are a lot of possible looks with just the one pattern! 

In-seam pockets are another option, but I chose to do without them. I know a lot of peope love pockets, but it's not that important to me. I know, I know... I will probably be shunned from the sewing community for admitting that. 

All three views are sewn with a center seam in the back and include an inverted pleat on the "skirt" part of the cardigan. The shaping is great, while still having enough room for layers. 


Please ignore my hair in these pictures. I showered right before we headed out the door to go play at the park. My thought process was that my hair would dry at the park and we could take pictures right afterwards. The problem was that it was so humid outside, my hair never really fully dried and I just got hot and sweaty at the park. Oh well, the pictures had to be taken, wetish hair and all.

The good news was that wearing the cardigan over an otherwise boring ensemble of a tank top and jeans made me feel put together while out and about. Yet I was also very comfortable while playing with my kids at the park.Win win.


To recap the details about the pattern:

-3 views: A-line, Gathered, Waterfall.
-3 sleeve options: sleeveless vest, 3/4, long.
-Optional in-seam pockets.
-Optional elbow patches.
-PDF pattern includes layers so you can print only your size.
-Trimless-less pattern pieces make it very fast and easy to assemble the pattern.

To see more views, pictures, fabric requirements or to purchase the pattern, click here (affiliate link.) It's currently on sale through this Thursday!

I know I say this every time I blog about a Love Notions pattern, but I appreciate all the hard work and fine tuning that the pattern designer puts into the testing process. She goes through multiple revisions to get a great fit and to make sure her tutorial is clear and I highly recommend her patterns for this reason. 


Friday, May 13, 2016

Pretty Fabrics Part 2: Grain and Stretch

Continuing our discussion of fabrics, we are going to talk about two things today: Grain and Stretch.

What is fabric grain? The short answer is the direction the threads in the fabric have been woven, or in the case of knit fabrics, "knitted."

It matters because if you cut your fabric off grain, you can end up with twisting, stretching or draping in your sewn garment when those things shouldn't be there.

Let's say you buy one yard of a woven fabric. And this fabric is a flannel and is 42" wide. Not all fabrics will be the same width. Quilting cottons are usually 44" wide, knits are usually wider with 60" being a popular width. But I digress. You will notice trends in widths based on fabric types the more you shop for them.

After cutting this particular fabric at one yard (36"), we have a rectangle which measures 36" x 42".

(This picture was taken after the fabric was washed, so it did shrink a little bit. You can also see how the edges frayed as this is a woven fabric.)

Here is said fabric:


I have labeled the selvage, cut edges, lengthwise grain direction, cross grain direction, and bias direction.

The selvage edges are the ones that weren't cut and didn't fray when washed, or frayed minimally. The distance between the selvages is the original width of the fabric, in this case 42". The edges that frayed are the edges that were cut off the bolt when you purchased your yard of fabric.

The lengthwise grain direction or simply sometimes called the grain is parallel with the selvage edges. There shouldn't be any stretch when you pull the fabric in this direction (in wovens.)

The cross grain direction runs perpendicular to the grain direction and selvage edge. There might be a little stretch or give when you pull the fabric this way. If it's a stretch woven, this should be the direction the stretch runs.

The bias direction runs diagonally across the fabric. When pulled in this direction, there should be a good amount of stretch. This is why you do not want to cut your fabric willy nilly, if cut on the bias you will get a lot of stretch and your garment will not hang correctly. These stretching properties can be used for good, however. For example, you cut the fabric on the bias when you want to make bias tape, which should have some stretch. Here is a link to a blog post about bias tape, we will not cover it at this time, but you can read more about it if you want to know more.

When using a pattern, it should specify which way the grain should go when cutting out your fabric. Line up this grainline marking parallel with the grain line on your fabric. We will talk about this again when we talk about using patterns.

If creating your own pattern, you will want to remember that any stretch in the fabric should go around the body. Just to get an idea of what I'm talking about, pull on your t-shirt, notice the direction of the stretch on the body and sleeves.

The fabric I used above was a woven, think of the threads in the fabric as threads in a wicker basket. They should be perfectly aligned at 90 degree angles like a perfect tiny checkerboard. But sometimes they aren't and get off grain. This is a great blog post for understanding what off grain looks like and how to get it back on grain. (Click on the link for more info.) For our beginner projects, this will not matter much, but it will once we start cutting bigger pieces and making apparel. This will be something to have in mind later. Don't let this information overwhelm you at this point, if you are like me, the best way to learn is simply jumping in, doing it, and learning from your mistakes. So for now, make a mental note of this and when you are more comfortable with the sewing process, come back and visit this later.

Now, we have been talking above wovens. Let's chat about knits too. The same terminology and labels still apply, but knit fabrics behave a little bit differently.

One difference is that in knit fabrics, the cross grain direction will have some stretch for sure. Some fabrics will also stretch in both directions, which is what is referred to as having four way stretch. If they only stretch horizontally, or across the cross grain, they are called two way stretch. These names confused me until I thought of it in the following way:


I had been thinking about it as two possible directions, horizontally and vertically, so once I figured that out mentally, it was an ah-ha moment. I was thinking, how can four way be possible? There are only two possible directions? Nope, I was just confused.

Don't laugh at me, we have all been there. I was also that kid who couldn't figure out my right from my left until I was embarrassingly old. Why does left change every time I turn around? See, my brain needs to figure these things out on its own.

Stretch percentages will matter too when it comes to selecting the right fabric for the job. However, we will cover this later when we learn about sewing with knits. I don't want to overwhelm you at the moment. It's not difficult to figure out how much stretch a fabric has, but not too important at this time in our series.

Another thing that is different about knits, is how to tell if you are truly cutting your fabric on grain. As it is not woven, the tutorial I linked above isn't quite accurate. Sure a good pressing before you cut out will be a good idea, but when you cut, you should take a close look at your fabric. Here is a very close look:


Do you see rows of lines? Those are your grain lines and what you should ideally line up your grain line markings in your pattern pieces. You can also tell that my fabric would benefit from a good pressing and being laid more straight before I cut it.

Here is the same fabric zoomed out, isn't it pretty?


Some fabrics, such as rib knit, will have very obvious lines. Some such as the one above, need a very close look.

Here is one more close look, this one is the purple one that is pictured up where we looked at the two way vs. four way stretch fabric:


One more look at the fabric at a regular size (my hand shows the scale.)


Finally, another difference with knit fabrics is that the cut edges will not fray. Some, but not all, will roll on the cut line.

When I first started sewing, I didn't know much about the grain line. I knew not to cut diagonally, but that was about it. As you start out, don't let this information scare you. Simply do your best, and learn from there.

This concludes our first week of our learning to sew party! Woo hoo! Next week, we will actually make some projects, I promise.

Your homework in the meantime is to find your manual. Look online if you can't find it. If you can't find the manual online, look on youtube for a video about threading your machine or any information you can find about your specific machine. If you really can't find anything, let me know. I will help or try to find someone who can.

In your manual, read the parts about all the parts on your machine and how to thread it. We will cover this on Monday, but you need to know how to thread your specific machine. Try to figure out how to thread it with your manual or a youtube video. 

I will be here to help first thing on Monday. See you there!